 Save to Pinterest
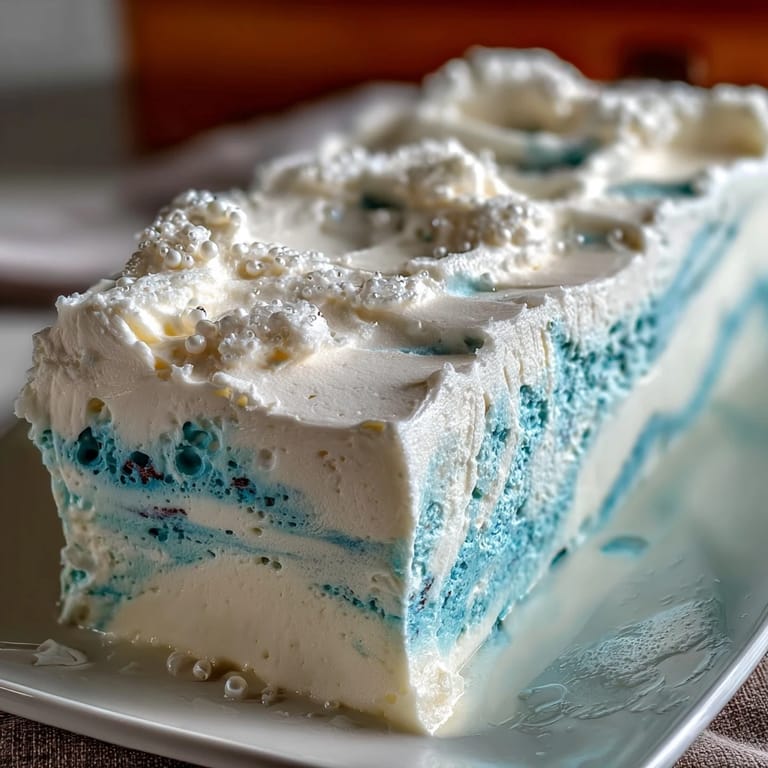
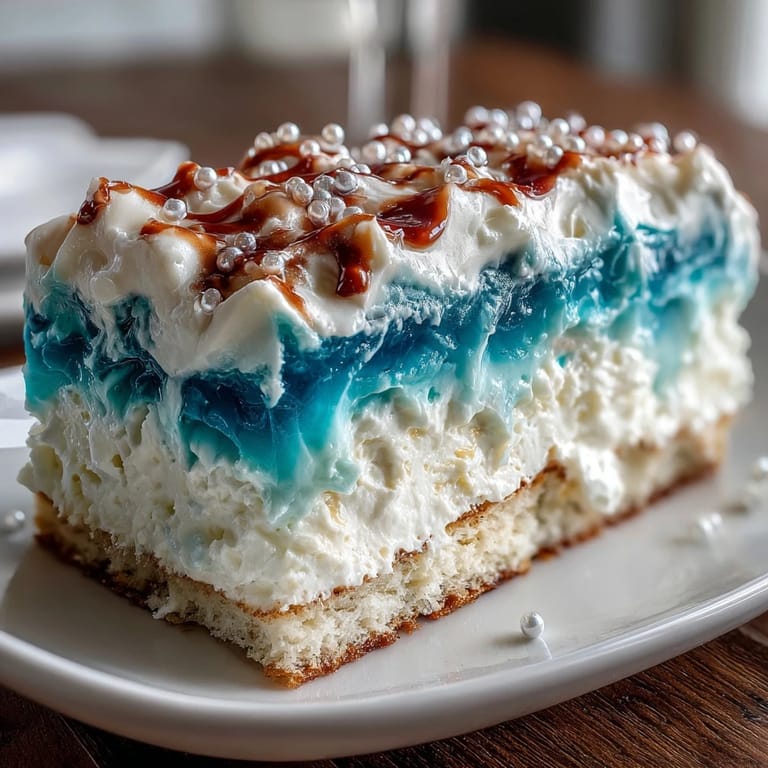
 My friend texted me a photo of her Pisces zodiac tattoo on her wrist, and I found myself staring at those flowing lines thinking about water, dreams, and all the things that swim beneath the surface. That's when I decided to bake her a cake that captured that feeling—something that looked like the ocean itself, all blues and movement and mystery. This sheet cake started as a silly idea in my kitchen on a rainy afternoon, but somewhere between mixing the batter and piping those waves, it became something I actually couldn't stop thinking about.
I brought this to a birthday dinner last summer, and someone asked if I'd bought it from a professional baker because the wave piping looked so intentional and precise. I had to laugh because half those waves happened by accident when my hand slipped, but that's exactly why it looked good—the ocean isn't perfect either. Watching people's faces light up when they realized it was homemade made the 90 minutes of work feel like the easiest decision I've ever made.
Ingredients
- All-purpose flour (2 ½ cups): The foundation of your tender crumb; sift it if it's been sitting in your pantry because packed flour can make the cake dense.
- Baking powder (2 ½ tsp): This is your lift, so use fresh baking powder that's been open less than six months if you want the cake to rise properly.
- Salt (½ tsp): Don't skip this even though it seems tiny; it wakes up the vanilla flavor and balances the sweetness.
- Unsalted butter (1 cup for cake, 1 ½ cups for frosting): Room temperature is non-negotiable here because cold butter won't cream properly and you'll get a dense cake instead of fluffy crumb.
- Granulated sugar (1 ¾ cups): The beating time with butter is what creates the air pockets that make this cake light, so don't rush those three minutes.
- Eggs (4 large ones): Room temperature eggs incorporate more smoothly; if yours are cold, sit them in warm water for five minutes.
- Pure vanilla extract (1 tbsp for cake, 2 tsp for frosting): Vanilla is the star here, so use real extract not imitation.
- Whole milk (1 cup for cake, ¼ cup for frosting): Room temperature milk helps the batter emulsify evenly without breaking.
- Powdered sugar (5 cups): Sift it before measuring because even new bags can be packed down, and lumpy frosting won't pipe smoothly.
- Blue gel food coloring: Gel works better than liquid because it won't thin your buttercream, and you can get those jewel-tone ocean shades.
- Edible pearls (optional): These catch light like little bubbles and remind you why you're making a cake that looks like it came from the sea.
Tired of Takeout? 🥡
Get 10 meals you can make faster than delivery arrives. Seriously.
One email. No spam. Unsubscribe anytime.
Instructions
- Set the stage:
- Preheat your oven to 350°F and get your 9x13-inch pan ready with parchment paper that you've tucked into the corners; this matters because it makes cooling and frosting easier.
- Build your dry team:
- Whisk flour, baking powder, and salt together in a medium bowl, breaking up any lumps as you go. This distributes the leavening evenly so you won't have dense pockets in your finished cake.
- Cream the butter and sugar:
- Beat room temperature butter and sugar until they're pale and fluffy, about three minutes with a stand mixer or hand mixer on medium speed. You're essentially whipping air into the butter, which is what gives the cake its tender crumb.
- Add eggs gradually:
- Drop in one egg at a time and let it fully incorporate before adding the next one, which prevents the batter from looking broken and separated. After all four eggs are in, beat in the vanilla extract until it's distributed.
- Alternate flour and milk:
- Add a third of the flour mixture, then half the milk, then another third of flour, then the rest of the milk, and finish with the last of the flour, mixing on low speed after each addition. The alternating method prevents overmixing and keeps gluten development to a minimum, which means a tender cake instead of a tough one.
- Get it in the oven:
- Pour the batter into your prepared pan and use an offset spatula or the back of a spoon to smooth the top so it bakes evenly. Bake for 28-32 minutes until a toothpick inserted in the center comes out clean or with just a few crumbs.
- Cool with patience:
- Let the cake sit in the pan for ten minutes while it sets slightly, then turn it out onto a wire rack to cool completely. This prevents the cake from cooking further in the residual heat of the pan.
- Make your ocean in buttercream:
- Beat softened butter until it's creamy and pale, then slowly add sifted powdered sugar while mixing on low speed to avoid a cloud of sugar coating everything. Add vanilla and milk and beat until the frosting is smooth and spreadable.
- Create your color palette:
- Divide the frosting into separate bowls and tint each with gel food coloring in shades ranging from deep navy to pale aqua, leaving one portion white. Gel coloring won't water down your frosting the way liquid coloring does.
- Apply the crumb coat:
- Spread a thin layer of white frosting over the completely cool cake to seal in crumbs, then chill it for twenty minutes until the frosting is firm. This prevents dark cake crumbs from mixing into your pretty blue frosting later.
- Layer your waves:
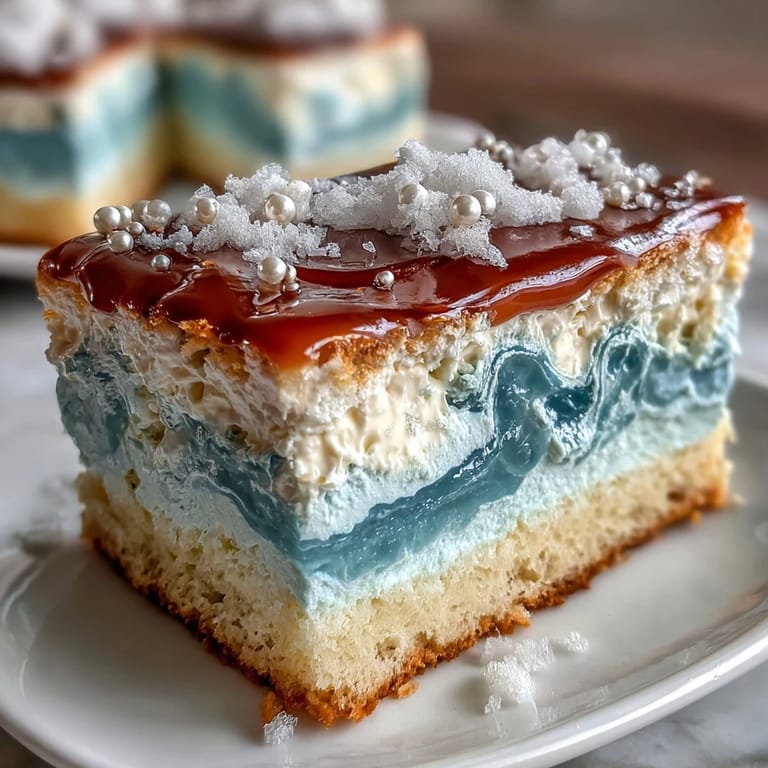
- Using an offset spatula with swooping, curved motions, layer the blue frostings from darkest at the bottom to lightest at the top, mimicking the movement of ocean waves. The motion matters more than the precision here; the beauty comes from the flow and the ombré effect.
- Add the foam:
- Pipe or swirl white buttercream on top of the waves to create the effect of sea foam and breaking water. Use a piping bag with a round or petal tip if you want more control, or just swirl it freehand for a looser, more organic look.
- Finish and flourish:
- Scatter edible pearls across the cake if you're using them, and if you want, add a Pisces symbol piped or placed on top. Let the cake chill in the refrigerator for at least thirty minutes before serving so the frosting sets and the waves hold their shape.
 Save to Pinterest
 The thing about making a cake that looks like the ocean is that it reminds you why we decorate food in the first place—it's not just about impressing people, it's about saying I thought of you and I wanted to make something beautiful land on your plate. When my friend bit into that blue and white cake and tasted the clean vanilla underneath all the artistry, she got it.
The Secret to Smooth Waves
I learned this the hard way after my first attempt looked more like muddy swirls than ocean movement—the frosting temperature and consistency matter as much as your technique. Keep the frosting around 65-70°F, which means if your kitchen is warm, chill it between layers and work quickly but not frantically. An offset spatula with a slight bend works better than a straight one because the angle lets you make those flowing curves without fighting gravity, and if your frosting starts to soften, give it ten minutes in the fridge and keep going.
Why Vanilla Works Here
There's something about a plain vanilla cake with elaborate decoration that feels like a beautiful secret—the simplicity of the flavor lets the texture shine, and it pairs with just about every beverage you'd serve alongside it. I've tried adding almond extract, lemon zest, and even a touch of almond liqueur, and while they're interesting, they distract from what makes this cake work: the moist crumb and the visual story you're telling with the frosting. If you do want to play with flavor, a small amount of lemon zest in the batter is the only addition I'd recommend because it brightens everything without competing.
Making It Ahead and Troubleshooting
You can bake the cake layers up to two days ahead if you wrap them carefully and store them at room temperature, and you can make the buttercream up to three days ahead and keep it in the refrigerator. Frosting and decorating should happen no more than twelve hours before serving because the exposed frosting can start to taste a bit waxy after that, though the cake itself stays moist for days. If your waves don't look perfect, remember that real ocean waves aren't symmetrical either, and a cake that looks intentional but imperfect is far more interesting than one that feels too manufactured.
- If the cake sinks in the middle, your oven temperature might be running low—invest in an oven thermometer for about ten dollars because it's a game-changer.
- If the buttercream is too soft to hold waves, chill it in fifteen-minute increments until it's stiff enough to hold its shape but still spreadable.
- If you're nervous about the waves, sketch them in with a toothpick first and use that as your guide for the offset spatula.
 Save to Pinterest
 This cake became my go-to for anyone with a Pisces birthday, but honestly it works for anyone who appreciates something that tastes as good as it looks. Make it for someone you want to impress, or make it just because you want an excuse to spend an afternoon creating something beautiful in your kitchen.
Recipe FAQ
- → What flour type works best for this cake?
All-purpose flour is ideal to achieve a balanced texture that is moist yet sturdy enough to hold the buttercream layers.
- → How do you create the blue ombré effect in the buttercream?
Divide the buttercream into multiple portions and tint each with progressively lighter shades of blue gel food coloring to layer from dark to light.
- → What is the best technique to pipe ocean waves on the cake?
Use an offset spatula or piping tips to sweep the buttercream in swooping motions, starting with the darkest shade at the base and layering lighter shades upwards for a wave-like appearance.
- → Can this cake be made ahead of time?
Yes, the cake can be baked and decorated in advance. Chill between decorating steps for clean lines and refrigerate covered to maintain freshness.
- → Are there any allergy considerations?
This cake contains wheat, eggs, and dairy. Optional decorations may introduce nut traces; always check ingredient sources if allergies are a concern.