 Save to Pinterest
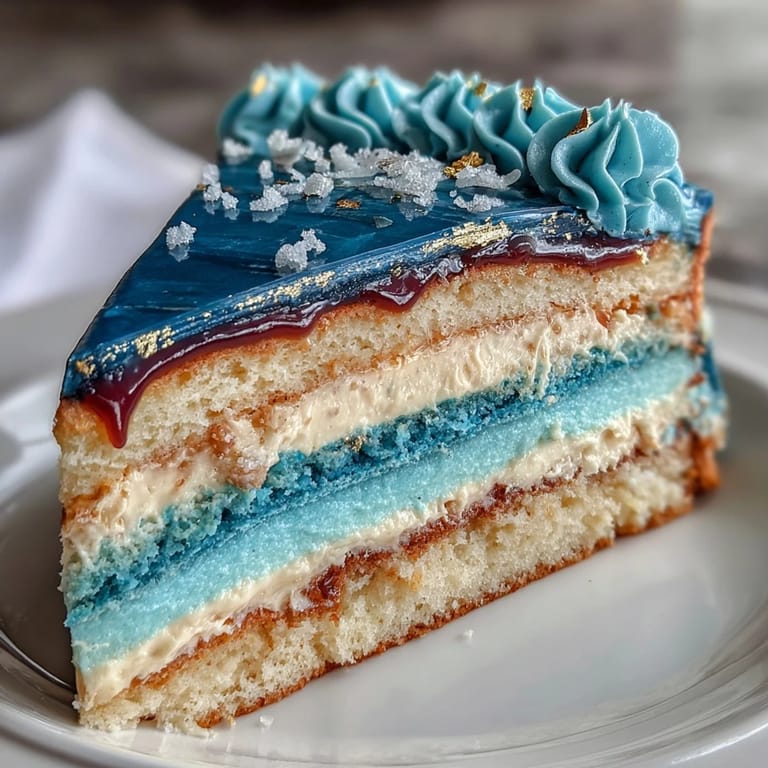
 There was a Saturday I devoted to making this graduation cake, and I can still hear the background playlist I selected: upbeat, lively, echoing outside the kitchen as I mixed the batter. The smell of vanilla and butter seemed to hang in the air longer than usual, maybe because I kept pausing to check my ombre layers for color intensity. The first time I added gold leaf, I accidentally brushed a streak onto my sleeve—now, whenever I prep gold accents, I remember that glimmer and laugh quietly. Making a cake that feels bold and celebratory is a different kind of pleasure, almost theatrical, especially when layering deep blues and shining gold. In fact, the atmosphere feels electric: anticipation is visible in every swirl of frosting.
I remember making this cake for my cousin's graduation—he wanted something "cool, not boring," so we brainstormed colors in the living room, settling on deep blue and gold. Everyone gathered near the kitchen, sneaking peeks as I smoothed on the final layer. There were cheers when I placed the last gold leaf and laughter when someone joked about blue tongue checks. Slicing into the cake created a hush, and I realized how much a thoughtful cake can anchor a celebration. Now, I always save a little extra gold for a surprise touch on the serving plate.
Ingredients
- All-purpose flour: Choose a quality flour for a fine crumb—always sift for best results.
- Baking powder: Freshness matters; old baking powder can dull your rise.
- Baking soda: Adds gentle lift alongside the powder, and you only need a pinch.
- Salt: Never skip it—just a bit sharpens all the flavors.
- Unsalted butter: Room temperature is crucial; cold butter doesn’t mix well for cakes.
- Granulated sugar: Cream it well for fluffiness—this is the trick to light layers.
- Eggs: Room temperature eggs blend smoothly and make the batter richer.
- Vanilla extract: Real vanilla rounds out sweetness—use the good stuff if you can.
- Whole milk: Warmed slightly, it makes the batter silky and easier to divide for ombre coloring.
- Blue gel food coloring: Gel colors give vivid shades without watering down the batter—use navy, royal, and light blue for the gradient.
- Powdered sugar: Sifting avoids clumps and leads to a smooth, cloud-like buttercream.
- Milk or cream: Start with less, add as needed to get the perfect spreadable consistency.
- Edible gold leaf or gold dust: Goes on last—handle gently, and be sure what you buy is really edible.
- Clear alcohol: If using gold dust, mix with vodka or lemon extract so it paints easily without streaking.
Tired of Takeout? 🥡
Get 10 meals you can make faster than delivery arrives. Seriously.
One email. No spam. Unsubscribe anytime.
Instructions
- Prepare the pans and oven:
- Set your oven to 350°F (175°C), grease and line three 8-inch pans with parchment—the paper helps the cakes release cleanly, so don’t skip it.
- Mix dry ingredients:
- Whisk flour, baking powder, baking soda, and salt together in a medium bowl; the swirling motion releases the light scent of flour and clears any lumps.
- Cream butter and sugar:
- In your stand mixer, beat butter and sugar until light and fluffy—watch for the moment when it changes from yellow to pale ivory.
- Add eggs and vanilla:
- Beat in eggs one by one, scraping the bowl often; add vanilla and let the aroma bloom.
- Combine wet and dry:
- Alternate adding flour and milk, beginning and ending with flour; the batter should be satin-smooth but not overmixed.
- Divide and color batter:
- Evenly portion your batter into three bowls; tint each a different shade of blue, starting with just a toothpick’s worth, then adjusting for intensity.
- Fill pans and bake:
- Pour each colored batter into its own pan, gently smooth the tops, then bake for 25–30 minutes—when golden at the edges and a tester comes out clean, they’re done.
- Cool cake layers:
- Let cakes sit for 10 minutes, then turn onto racks; feel the warmth fade as you peel away parchment, revealing the hues.
- Make the buttercream:
- Beat butter until creamy, slowly add sifted powdered sugar; vanilla, salt, and cream come last—taste and adjust for smoothness.
- Tint the frosting:
- Reserve a cup for crumb coating, then mix dark blue into the remainder; stir gently to keep the texture fluffy.
- Assemble the cake:
- If needed, level the layers; stack darkest to lightest, spreading buttercream between each tier, then top with the palest blue.
- Apply crumb coat:
- Cover the cake thinly with reserved buttercream and chill for 20 minutes so the final layer goes on cleanly.
- Decorate ombre frosting:
- Spread dark blue buttercream over the cake, blending lighter blues upward for a gradient; use an offset spatula for smoothness.
- Add gold accents:
- Delicately apply edible gold leaf or brush on gold dust—try bold streaks along one edge or dapple as if painting.
- Chill and serve:
- Let your finished cake chill until ready to slice; every layer shows when you cut, inviting applause.
 Save to Pinterest
 The excitement peaked when my cousin pressed a gold star into the icing after the ceremony. Everyone paused to take photos, kids squealed, and grandparents, who rarely eat cake, asked for a slice. That moment blurred food, artistry, and pride into pure celebration. Since then, the cake signals not just accomplishment but connection, marked in blue and gold. It’s a centerpiece that feels personal every single time.
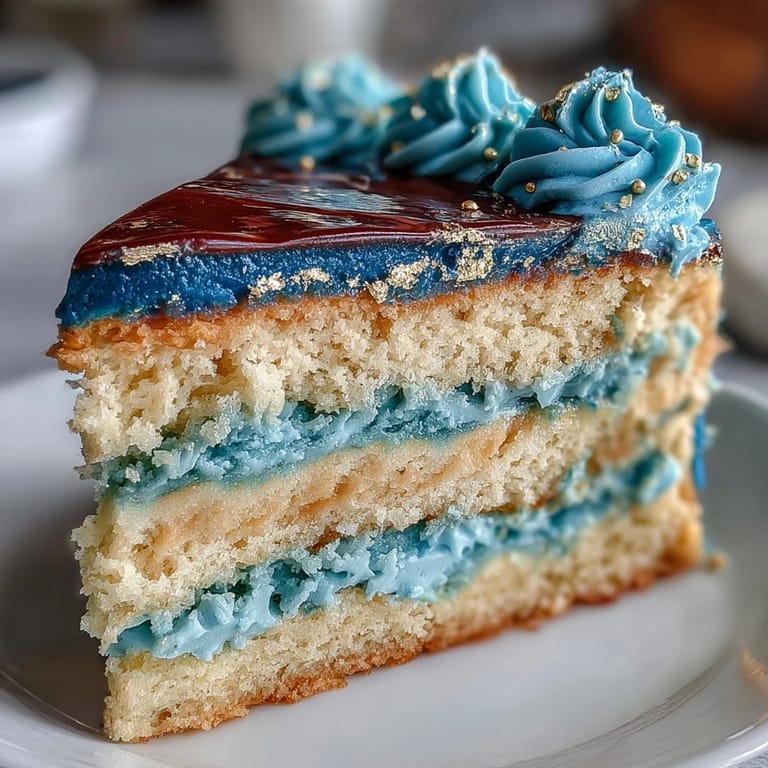
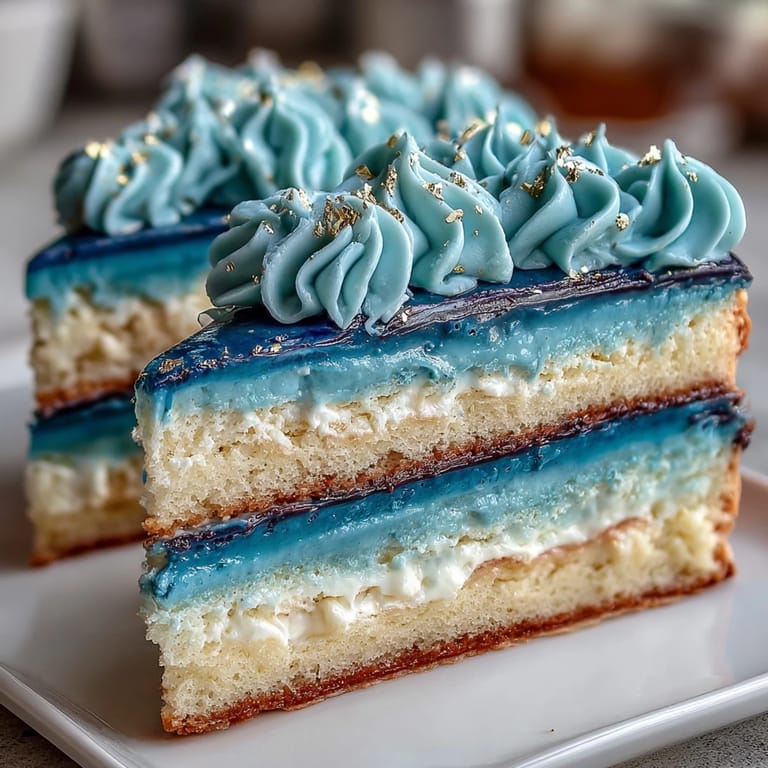
Making Perfect Ombre Layers
My early attempts at ombre were a lesson in patience—the first time, I made two layers nearly identical by accident, so now I start with a tiny dab of color and work up the intensity thoughtfully. Swirling the food color through the batter feels like painting, but a gentle hand makes for clear gradation. Remember to use separate bowls, and wipe utensils between colors to avoid muddying the hues. If you’re nervous, line up the bowls before pouring, so the effect looks intentional rather than accidental. Vibrant shades pop so much more when you slice into them.
Decorating with Gold Accents
Gold leaf is delicate and a little nerve-wracking at first, so handle with tweezers or a brush—don’t breathe on it! I keep the cake chilled before applying gold, since warm buttercream makes the leaf slide and curl. For gold dust, mix until it’s a thin paint, then use a small brush to add highlight edges or abstract streaks. Mistakes are easy to fix: pat gently with a clean brush or add an extra bit of gold on top. Mixing gold with deep blue always reminds me why some desserts feel like a party before they’re even eaten.
Serving and Storage Suggestions
Let the cake come to room temperature before serving so every layer melts perfectly on the tongue. If you have leftovers, wrap slices snugly in plastic and refrigerate—blue color stays vibrant for days. Use a clean, sharp knife for each cut to preserve the ombre look. Celebrate with graduation-themed toppers or fresh berries if you want extra flair.
- If making ahead, assemble and chill overnight, then decorate gold just before serving.
- Don't skip the parchment lining—it guarantees easy layer removal.
- If unsure about gold decorations, check packaging for food safety.
 Save to Pinterest
 Cakes made for milestones become stories in themselves. I hope yours finds its way into a joyful toast and sparks some memories to treasure.
Recipe FAQ
- → How do you achieve the ombre effect in the cake layers?
Divide batter equally, tint each bowl with a different intensity of blue gel coloring, then bake separately for a gradient look.
- → What is the best way to apply gold decorations?
Use edible gold leaf for a striking finish, or mix gold dust with clear alcohol and brush gently for detailed accents.
- → Can I prepare the cake layers in advance?
Yes, bake layers up to a day before, wrap them tightly, and refrigerate to maintain freshness before assembling and decorating.
- → How do I ensure the buttercream is smooth and creamy?
Beat butter thoroughly before gradually adding powdered sugar; adjust consistency with milk or cream for a silky texture.
- → Is this cake suitable for vegetarians?
Yes, the cake contains no meat ingredients and is vegetarian-friendly. Check gold decorations for any additional allergens.