 Save to Pinterest
 There's something about the smell of hot sugar that makes me feel like a kid again, even though I'm standing in my own kitchen as an adult. Years ago, I watched my grandmother dip apples into a glossy red candy mixture at a county fair stand, and the way the coating clung to each apple like liquid rubies completely mesmerized me. When I finally tried making them myself on a random October afternoon, I burned the first batch because I got distracted texting a friend, but the second attempt came out perfect, and suddenly I understood why she'd made them every fall. Now they're my go-to when I want something that feels special without requiring professional baking skills.
I made these for a Halloween party last year and watched my neighbor's teenage daughter take one bite and immediately ask for the recipe. She said it reminded her of visiting state fairs as a kid, and something about that moment—how a candy apple could unlock a whole memory for someone—made me realize these aren't just treats, they're little edible time machines. Everyone at that party kept coming back for seconds, and I ended up giving away three apples I'd planned to keep for myself.
Ingredients
- Granny Smith or Gala apples (8 small to medium): Granny Smiths bring a sharp tartness that balances the sweet candy, while Galas add subtle honey notes; I learned the hard way that mealy apples disappoint, so always squeeze gently at the store to find firm ones.
- Wooden sticks (8): Craft sticks or popsicle sticks give you something to hold without burning your fingers, and wood feels better in hand than plastic alternatives.
- Granulated sugar (2 cups): This is your base for that glossy, hard-crack candy shell that snaps between your teeth.
- Light corn syrup (1/2 cup): This prevents crystallization and keeps your coating smooth and shiny instead of grainy and dull.
- Water (3/4 cup): It dissolves the sugar and creates the liquid base for your candy mixture.
- Red gel or liquid food coloring (1/2 tsp): Gel coloring gives you that deep, true red without watering down the candy the way liquid food coloring sometimes does.
- Cream of tartar (1/8 tsp, optional): This ingredient is a secret weapon for extra smoothness and prevents unwanted crystallization if you're making candy for the first time.
- White chocolate (3 oz): Quality matters here because cheap white chocolate tastes waxy; splurge a little on chips or bar chocolate that actually contains cocoa butter.
- Coconut oil or vegetable oil (1 tsp, optional): A tiny bit of oil makes the drizzle flow smoothly without pooling or cracking as it sets.
Tired of Takeout? 🥡
Get 10 meals you can make faster than delivery arrives. Seriously.
One email. No spam. Unsubscribe anytime.
Instructions
- Set your station up for success:
- Line a baking sheet with parchment and lightly grease it so your finished apples won't stick. Insert a stick firmly into the stem end of each apple at a slight angle, which gives you better control when dipping and keeps the apple from spinning.
- Combine your candy base:
- In a heavy-bottomed saucepan, gently stir together sugar, corn syrup, water, and cream of tartar until everything is wet and combined. This is not the time to whisk aggressively; you're just making sure the dry sugar contacts the liquid.
- Heat without stirring:
- Set the pan over medium heat and attach your candy thermometer to the side. Let it come to a boil without stirring further, which prevents crystallization and keeps your final candy smooth.
- Add color at the right moment:
- When the mixture hits 250°F, pour in your red food coloring and gently swirl the pan to distribute the color evenly. Avoid stirring with a spoon, which can cause grainy texture.
- Reach the hard-crack stage:
- Continue cooking until the thermometer reads 300°F, which should take another few minutes. You'll notice the bubbles get smaller and the mixture turns a deeper amber-red; this is exactly where you want it.
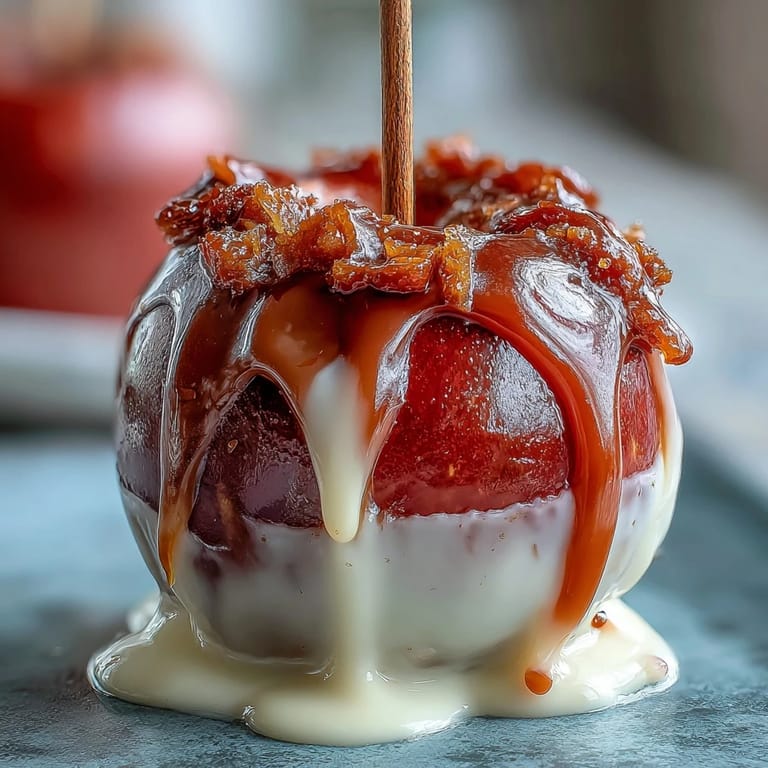
- Dip with confidence:
- Remove the pan from heat immediately and let it sit for 10 seconds so the surface isn't actively boiling when you start dipping. Work quickly but carefully, tilting the pan and rotating each apple to coat all sides, then let excess drip back into the pan before placing it on your prepared sheet.
- Give the coating time to set:
- Wait about 10 minutes for the candy shell to harden completely before moving on to the white chocolate drizzle. Patience here prevents the coating from cracking or sliding off.
- Melt white chocolate gently:
- Place chopped white chocolate and a teaspoon of coconut oil in a microwave-safe bowl and heat in 20-second bursts, stirring between each one. This slow method prevents overheating and keeps your chocolate smooth instead of broken and grainy.
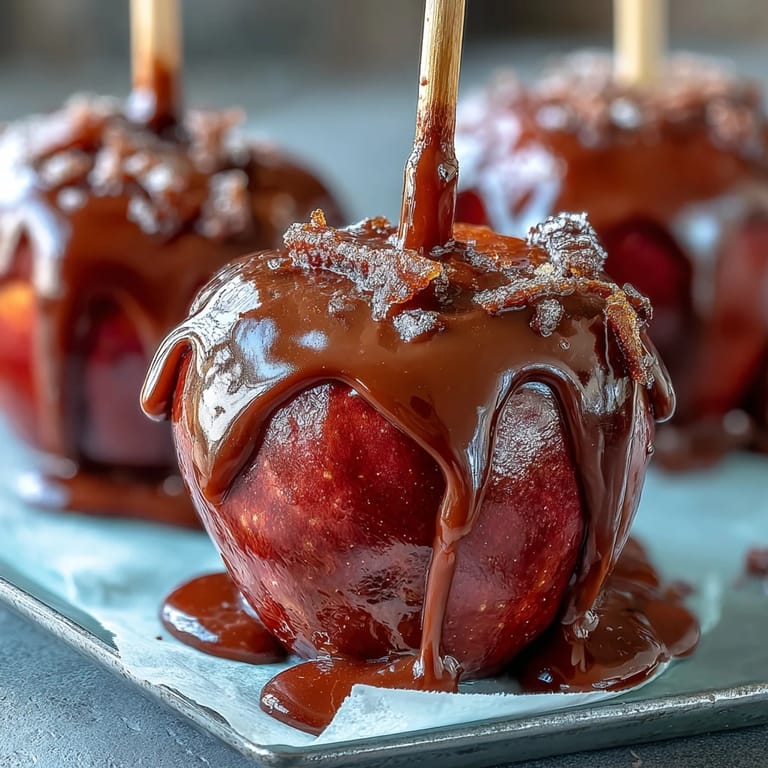
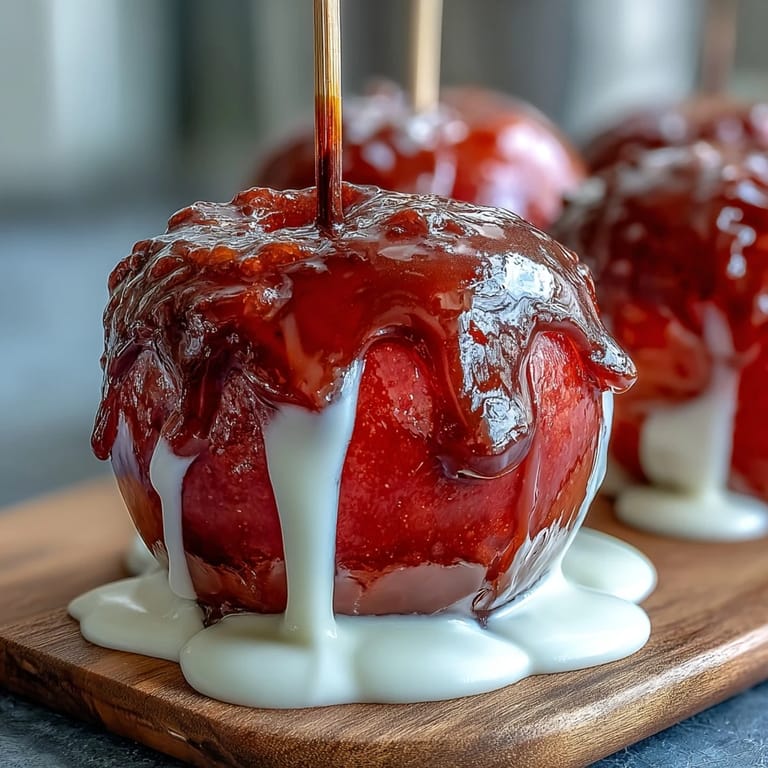
- Drizzle and finish:
- Use a spoon or piping bag to create thin white lines across each apple, letting the drizzle pool slightly in the curves. Let everything set for 10 minutes more before serving.
 Save to Pinterest
 My sister brought her kids over one afternoon and they watched the whole process from start to finish, completely mesmerized by the transformation of clear liquid into glossy red candy. When those apples were finally done, my four-year-old nephew held his up to the light and said it looked like a gem, which is exactly how I still think about them now.
The Science Behind the Snap
The magic of a perfect candy coating lives in understanding temperature and what happens to sugar at different heat levels. When you reach 300°F, the sugar molecules break down into a structure that hardens into that satisfying, glass-like shell that cracks between your teeth. The corn syrup and cream of tartar work together to prevent the candy from becoming grainy, which happens when sugar crystals form too quickly and randomly. I discovered this through one disastrous batch where I forgot the corn syrup and ended up with a coating that looked and felt like the inside of a geode—beautiful but completely unpalatable.
Storage and Keeping Them Fresh
Candy apples are best eaten the day you make them, when the coating is snappiest and the apple inside is still crisp and juicy. If you need to make them ahead, store them in a cool, dry place on your counter, never in the refrigerator, because moisture will soften the candy coating and make it weep. I've successfully kept them for two days this way, though by day three the apples start to oxidize slightly where the stem goes in, which looks less appealing but doesn't affect the taste.
Variations and Personal Touches
Once you master the basic red candy apple, the variations are endless and genuinely fun to experiment with. I've made orange-tinted apples by switching the food coloring and drizzling them with dark chocolate instead of white, and another time I rolled the apples in crushed cinnamon candy hearts right after dipping, which created this beautiful sparkly texture and added a spice note to every bite. The best part is that none of these variations adds complexity; you're just playing with colors and toppings while keeping the core technique exactly the same.
- Roll fresh-dipped apples in chopped nuts, sprinkles, or crushed hard candies while the coating is still tacky for instant texture and flair.
- Try swapping the white chocolate for dark chocolate drizzle if you want something richer and less sweet.
- Use vegan white chocolate and coconut oil if you're serving them to people with dairy allergies.
 Save to Pinterest
 There's real joy in creating something that tastes like nostalgia and looks like luxury, especially when it's completely within your reach. These apples remind me every time I make them why I fell in love with cooking in the first place.
Recipe FAQ
- → What type of apples work best?
Firm, tart apples like Granny Smith or Gala provide a crisp texture that contrasts nicely with the sweet candy coating.
- → How do I prevent the candy coating from sticking?
Make sure apples are completely dry before dipping and use a greased, parchment-lined surface to set the coated apples.
- → What temperature should the candy reach?
The candy mixture should reach the hard crack stage, about 300°F (149°C), for a perfect glossy shell.
- → Can I customize the white chocolate drizzle?
Yes, adding a small amount of coconut or vegetable oil helps create a smooth, easy-to-pour drizzle.
- → Are there any alternatives to white chocolate?
Vegan or dairy-free white chocolate substitutes can be used for a dairy-free finish without compromising flavor.