 Save to Pinterest
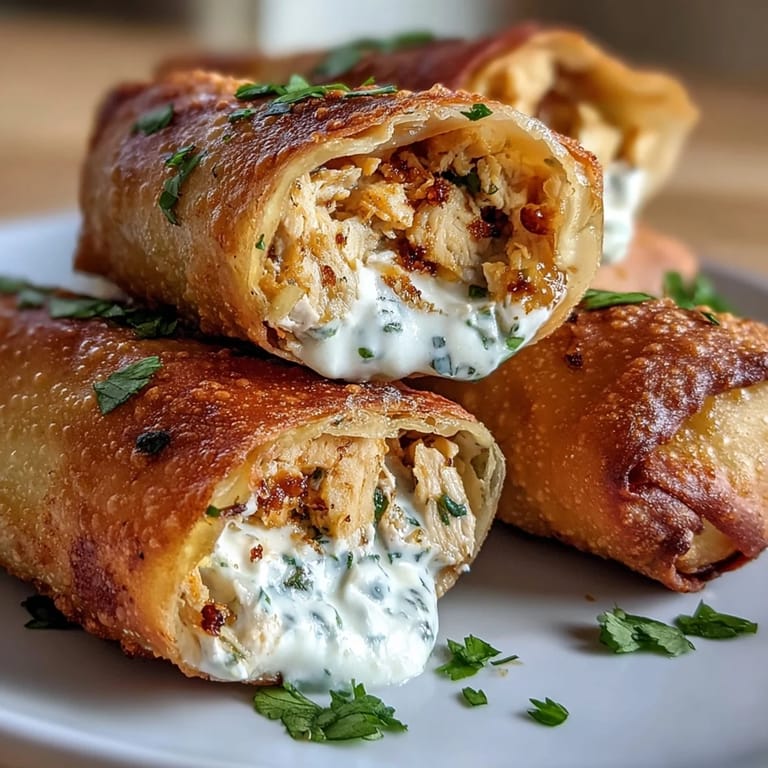
 My friend brought these to a tailgate party and I watched them vanish in under ten minutes. She wouldn't share the recipe until I agreed to host the next gathering, which felt like a fair trade once I tasted the creamy, spicy filling wrapped in that shatteringly crisp shell. I've been making them ever since, tweaking the heat level depending on who's coming over. They're small enough that people don't feel guilty going back for thirds, but flavorful enough that everyone remembers them. I once made a double batch thinking I'd have leftovers, and I was wrong.
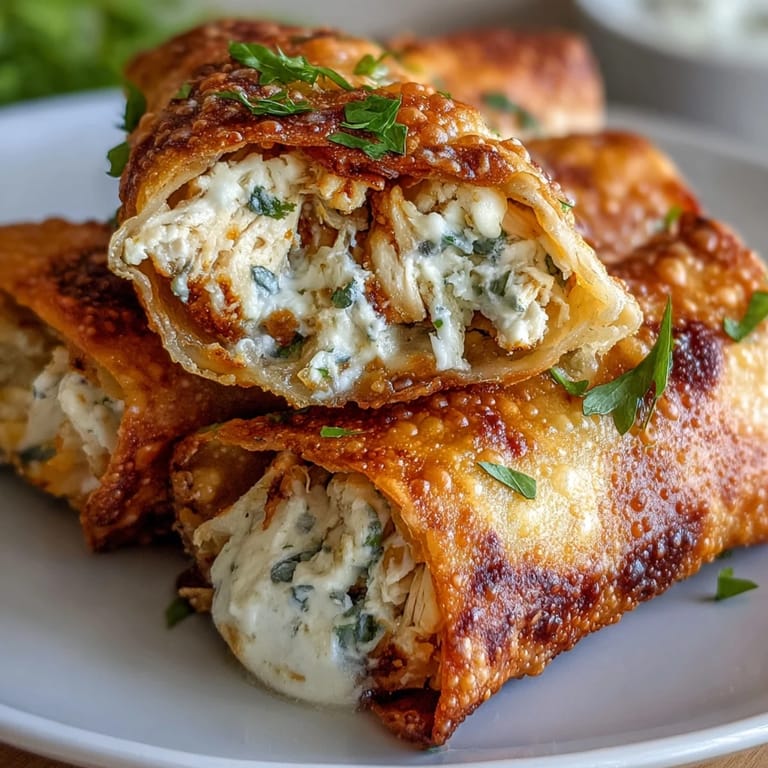
I started making these when I needed something more interesting than store-bought appetizers but didn't want to spend all day in the kitchen. The first time I served them, my brother-in-law asked if I'd ordered them from a restaurant, which I took as a massive compliment. Now they're my go-to whenever I want to look like I tried harder than I actually did. The smell alone gets everyone hovering near the kitchen before they're even done. I've learned to make extra because someone always asks for the recipe, and I like having a few left to reheat the next morning.
Ingredients
- Cooked chicken breast, shredded: Rotisserie chicken is your best friend here, it saves time and adds a little extra flavor from the seasoning.
- Green enchilada sauce: This is what keeps the filling moist and gives it that tangy, slightly spicy backbone.
- Ground cumin: A little goes a long way, it adds warmth without overpowering the other flavors.
- Garlic powder: I prefer this over fresh garlic in the filling because it distributes more evenly and doesn't burn during frying.
- Smoked paprika: Just a pinch adds depth and a subtle smokiness that makes people wonder what your secret is.
- Cream cheese, softened: Let it sit out for at least 30 minutes so it mixes smoothly with the jalapeño and herbs.
- Jalapeño, seeded and finely diced: Seeding it keeps the heat manageable, but leave a few seeds in if you like things spicy.
- Fresh cilantro: Adds brightness and a pop of color, don't skip it even if you're tempted.
- Green onions: They bring a mild sharpness that balances the richness of the cream cheese.
- Lime juice: Just half a teaspoon wakes up the whole filling and cuts through the fat.
- Egg roll wrappers: These crisp up beautifully and are way easier to work with than flour tortillas.
- Egg, beaten: This is your glue, it seals the wrappers so nothing leaks out during cooking.
- Cooking oil: Use something with a high smoke point like vegetable or canola if you're frying.
Tired of Takeout? 🥡
Get 10 meals you can make faster than delivery arrives. Seriously.
One email. No spam. Unsubscribe anytime.
Instructions
- Season the chicken:
- Toss the shredded chicken with green enchilada sauce, cumin, garlic powder, paprika, salt, and pepper until every shred is coated. The mixture should look glossy and smell incredible.
- Mix the cream cheese filling:
- Stir together the softened cream cheese, diced jalapeño, cilantro, green onions, and lime juice until smooth and evenly combined. Taste it and adjust the lime or salt if needed.
- Assemble the chimis:
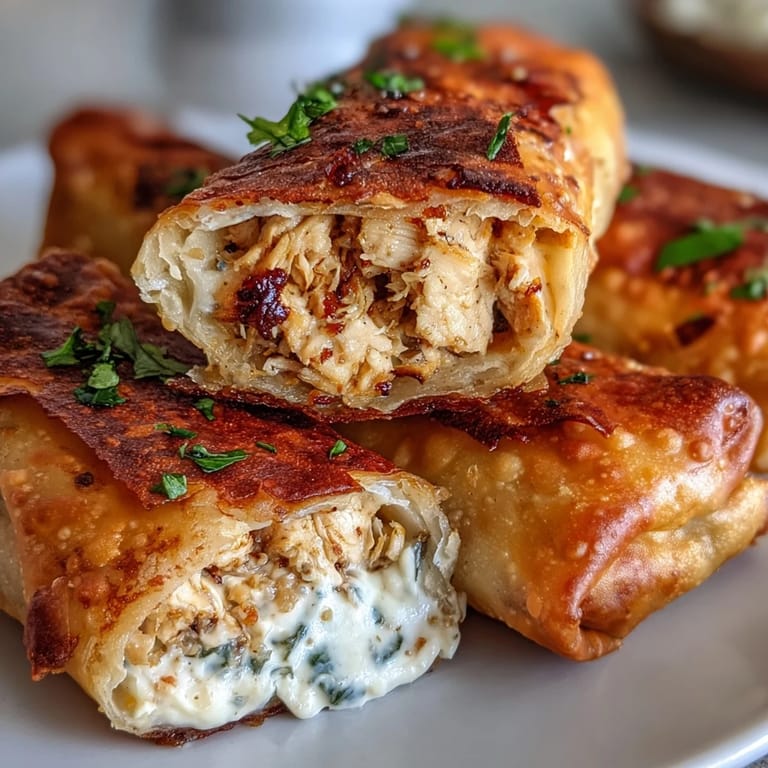
- Lay an egg roll wrapper with one corner pointing toward you, spread a tablespoon of cream cheese in the center, then top with two tablespoons of chicken. Fold the bottom corner over the filling, tuck in the sides tightly, roll it up, and seal the top corner with beaten egg.
- Fry or bake:
- For frying, heat an inch of oil to 350°F and fry in batches for 2 to 3 minutes per side until golden and crispy, then drain on paper towels. For baking, brush the chimis lightly with oil, place them on a parchment-lined sheet, and bake at 425°F for 15 to 18 minutes, flipping halfway through.
- Serve warm:
- Plate them up while they're still hot and crispy, with extra green enchilada sauce, salsa, or sour cream on the side. They're best eaten within the first few minutes, but they reheat surprisingly well in the oven.
 Save to Pinterest
 These became a tradition at our game day parties after I brought them once and got texts asking if I was making them again the following week. There's something about the way the cream cheese melts into the chicken and the wrapper shatters when you bite down that just works. I've served them to picky eaters, spice lovers, and people who claim they don't like Tex-Mex, and they all come back for more. They're proof that sometimes the best recipes are the ones that don't try too hard but still manage to steal the show.
Making Them Ahead
You can assemble these completely, arrange them on a baking sheet, cover tightly with plastic wrap, and refrigerate for up to 8 hours before cooking. I've even frozen them for up to a month, just don't thaw them before frying or baking, go straight from freezer to heat and add a couple extra minutes to the cooking time. This makes them perfect for planned parties or those nights when you need something impressive without the stress. Just remember to keep them in a single layer so they don't stick together.
Adjusting the Heat
If you're serving a mixed crowd, you can dial the spice up or down pretty easily. Use mild green chilies instead of jalapeño for a family-friendly version, or leave some seeds in the jalapeño and add a pinch of cayenne to the chicken if you want more kick. I've also swirled in a little hot sauce with the cream cheese when I'm feeling bold. The beauty of this recipe is that the base is forgiving, so you can tweak it to match your audience without losing what makes it good.
Serving and Pairing
I like to serve these on a big platter with little bowls of dipping sauces scattered around so people can customize each bite. Sour cream, salsa verde, pico de gallo, and even a drizzle of ranch all work beautifully. They pair well with a cold lager, a lime margarita, or even iced tea if you're keeping things casual.
- Set out napkins, these are finger food and things can get messy in the best way.
- Keep a batch warm in a low oven if you're serving them over a longer period.
- Leftover chimis reheat well in a 375°F oven for about 10 minutes, skip the microwave or they'll get soggy.
 Save to Pinterest
 These little chimis have earned a permanent spot in my recipe rotation, and I hope they do the same for you. They're proof that something this simple can still feel special, especially when shared with people you care about.
Recipe FAQ
- → Can I make these mini chimis ahead of time?
Yes, you can assemble them up to 4 hours ahead and refrigerate covered. Fry or bake just before serving for best texture and crispiness.
- → What's the best way to reheat leftover chimis?
Reheat in a 375°F oven for 8-10 minutes or use an air fryer at 350°F for 5-6 minutes to restore crispiness. Avoid microwaving as it makes them soggy.
- → Can I use flour tortillas instead of egg roll wrappers?
Egg roll wrappers provide the signature crispy texture, but small flour tortillas can work. They'll yield a softer, more traditional chimichanga texture rather than the crispy crunch.
- → How do I prevent the chimis from opening during cooking?
Ensure you seal the edges thoroughly with beaten egg wash and roll them tightly. Avoid overfilling, which can cause bursting during cooking.
- → What dipping sauces pair well with these?
Green enchilada sauce, salsa verde, sour cream, guacamole, or chipotle ranch all complement the jalapeño cream cheese and chicken filling beautifully.
- → Can I freeze uncooked chimis?
Yes, freeze assembled unbaked chimis on a baking sheet, then transfer to freezer bags. Cook from frozen, adding 3-5 minutes to the cooking time.