 Save to Pinterest
 There’s something inherently joyful about the aroma of melting cheddar and fresh pastry wafting through the kitchen, especially when you know friends will be arriving soon. Last Derby Day, I found myself dancing around stray olive pits on the counter as I whipped up these cheese balls—each time, the anticipation builds as they transform from humble dough into bite-sized golden treasures. The recipe is forgiving, perfect for those kitchen moments when you’re balancing laughter and last-minute party prep. The clinking of little skewers as they’re passed around always starts a gentle competition for the last one. Even now, thinking of the buttery crunch and briny olive heat makes my mouth water.
One chilly afternoon, I made these cheese balls for a backyard gathering where everyone kept rooting for their favorite horse on an old crackling radio. Someone joked that holding the little skewers was the closest they’d get to a racetrack baton. Watching friends savor the warm, gooey cheese and crisp dough was better than picking the winning horse.
Ingredients
- All-purpose flour: Provides the structure for the dough and keeps the cheese balls from collapsing; I found sifting it first helps with even mixing.
- Sharp cheddar cheese, shredded: Brings tang and flavor depth—extra sharp works best for boldness, and finely shredding it ensures it melts evenly.
- Unsalted butter, softened: The secret to a rich, tender pastry; be patient and let it really come to room temperature for best results.
- Cayenne pepper (optional): Adds a slow-building warmth; use a light hand or skip it for less heat.
- Smoked paprika: A little smoky kick that makes the cheese pop and gives extra depth.
- Salt: Brings everything together—don't be tempted to skip it, but measure carefully.
- Large green olives, pitted: The star surprise inside; try to get them stuffed or briny, and pat them dry for easy wrapping.
- Appetizer-sized skewers or toothpicks: For serving—choose sturdy ones so the cheese balls don’t slip right off.
Tired of Takeout? 🥡
Get 10 meals you can make faster than delivery arrives. Seriously.
One email. No spam. Unsubscribe anytime.
Instructions
- Heat Things Up:
- Preheat your oven to 400°F (200°C) and lay out a sheet of parchment on your baking tray as the first wave of cheese scent promises good things to come.
- Get Messy with Dough:
- Mix the flour, cheddar, butter, cayenne, paprika, and salt in a medium bowl—dig in with your hands for that gloriously squishy texture, pressing it all together until a soft dough forms.
- Divide and Conquer:
- Pat the dough into a rough rectangle and cut or pinch into 24 equal bits; each should be about the size of a tablespoon and easily fit in your palm.
- Wrap the Olives:
- Flatten each dough piece, plop a green olive in the middle, and gently fold and pinch until the olive vanishes inside a snug cheesy coat; roll into smooth balls.
- Chill Out (Optional):
- Lay the balls on your prepared sheet—if you have time, chill them in the fridge for about 10 minutes so they hold their shape better when baked.
- Bake Until Golden:
- Slide the tray into the oven and bake for 16 to 18 minutes, watching for that beautiful golden glow and a hint of bubbly cheese aroma filling the air, then let them cool for 5 minutes.
- Finish and Serve:
- Thread each still-warm cheese ball onto a skewer or toothpick and serve up immediately, or leave them to rest at room temp—either way, they’ll go fast.
 Save to Pinterest
  Save to Pinterest
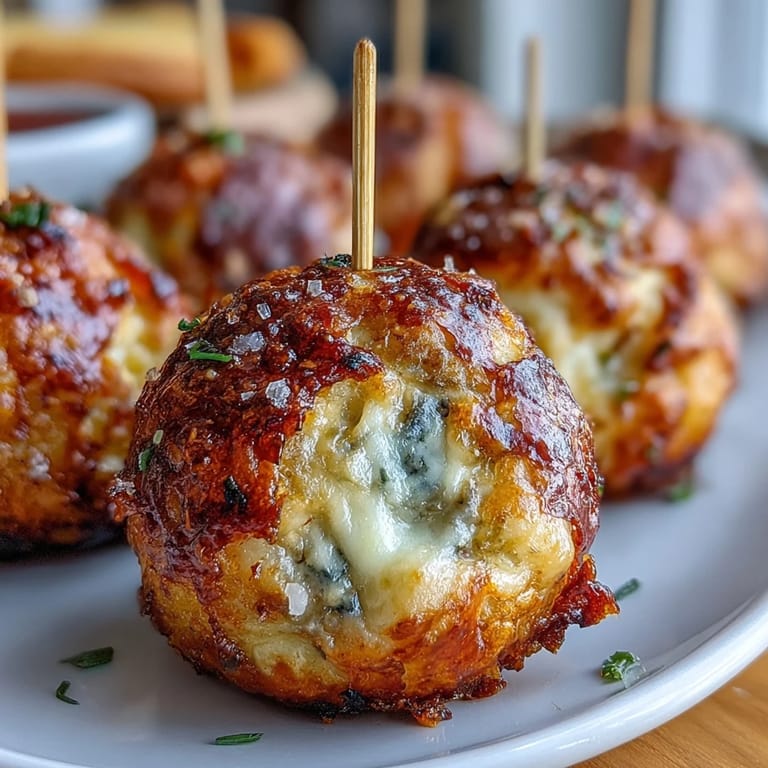
 During the last Derby party, a friend insisted these little snacks turned him into an olive convert right on the spot—he had to admit it over the sound of cheers and clinking skewers, making the whole kitchen erupt in gentle teasing and more toasts.
How to Serve and Savor
If I’ve learned anything, it’s to thread the freshly baked cheese balls while they’re still warm, then arrange them on a cheerful platter so guests can just grab and go. A quick grainy mustard dip or a bowl of spicy bourbon honey on the side turns the whole thing from snack to centerpiece in no time.
Choosing and Using Olives
Not all olives are created equal—Manzanilla is classic, but I’ve played with jalapeño-stuffed and even big, briny black olives for variety. The most important trick is to dry them thoroughly so the dough sticks and doesn’t slip off in the oven.
Baking Day Tricks
I find it easiest to shred the cheese myself, as pre-shredded never quite melts the same way or brings that sharp bite. If you notice the cheese balls browning unevenly, just give the tray a quick spin halfway through baking—no need to panic.
- Use cold hands when shaping the dough to keep things from getting sticky.
- Stick to parchment, not foil, to avoid sticking and messy bottoms.
- If making ahead, reheat uncovered in a hot oven to restore crisp edges.
 Save to Pinterest
  Save to Pinterest
 Whip up these Derby Party Olive Cheese Balls next time you need a surefire way to get people gathering around the kitchen—it’s impossible not to grab just one more, and there’s always a story waiting between bites.
Recipe FAQ
- → Can I make the dough ahead of time?
Yes. Prepare the dough, wrap it tightly, and chill up to 24 hours. Chilled dough is easier to portion and shape around the olives; allow a few minutes at room temperature before wrapping if it becomes too firm.
- → What olives work best?
Large green Manzanilla or Castelvetrano olives are ideal because they’re mild and hold their shape. Jalapeño-stuffed or black olives can be used for variation, but adjust other seasonings to balance the flavor.
- → How can I get a crisp, evenly browned exterior?
Arrange balls with space between them on a parchment-lined sheet and bake on the middle rack at 400°F. Chilling the formed balls for 10 minutes tightens the surface and helps them brown more evenly.
- → Can I make these dairy-free or gluten-free?
To avoid dairy, substitute a firm plant-based cheese and a vegan butter. For gluten-free, use a 1:1 gluten-free flour blend; texture will vary, so handle gently and consider refrigerating before baking.
- → How should leftovers be stored and reheated?
Store cooled balls in an airtight container in the fridge for up to 3 days. Reheat on a baking sheet at 350°F until warmed through to restore crispness rather than microwaving, which can make them soggy.
- → What dips pair well with these bites?
Grainy mustard, a bourbon-honey sauce, or a tangy yogurt-based dip complement the sharp cheddar and briny olive. Offer one or two contrasting dips for variety.